Interactive LWS FP Multi Gaussian Fitting
This tool is written for Interactive FP Multi Gaussian Fitting for a single "blended" line.
The input data should be averaged LWS spectra written out a
single- line data produced by ISAP-Average.
Fresh user must ask advise from instrument experts at RAL or IPAC.
Invoking the Interactive Tool
The command to be given to start this tool and a description of optional
keywords are given below:
; Example bfit_str=gui_fpmf('avespect_filename')
;
; Arguments Name
I/O
Type
Description
;
------------------------------------------------------------
;
filename I
string
the data, which is the output from ISAP after averaging, is in FITS format
;
(i.e.:averaged spectra; for single line at a time).
;
bfit_str O
structure
containg input an output parameters, and spectra.
;
bestfit.dat O
ASCII file
containg input and output parameters and spectra
;
;
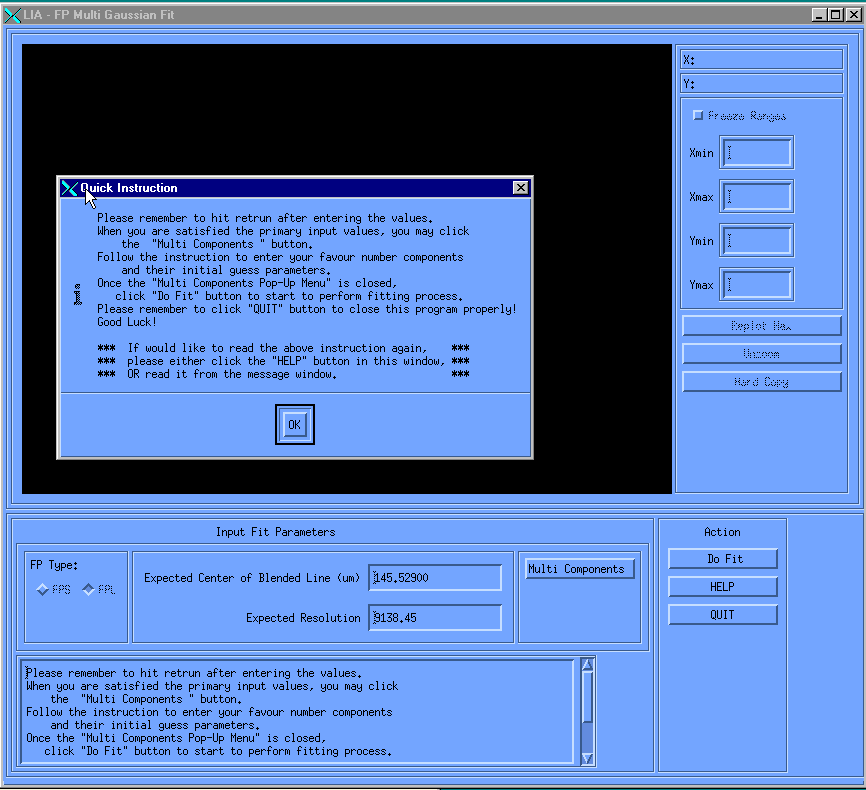
The main window (FP Multi Gaussian Fit) and quick help window
(Quick Instruction) will pop up.
A Description of the User Interface
The Quick Instruction gives a brief description of how to use
this program. It pops up automatically ONLY ONCE, during the first time
user invokes the program.
To see this instruction again, click on the HELP button in the main window.
The black area is the main PLOT window,
with its control buttons (Replot, Unzoom, Hardcopy) on its right side.
In this main window, user has to enter two fit parameters which are:
"Expected Center of blended line (µm)" and "Expected Resolution".
The default values of these parameters are displayed in the text boxes. These
values are estimated on the basis of values in the input file header (primary observation
information) and calibration data. If user has better values, s/he can be typed in the text
boxes, followed by a click of the "Enter" key in order to activate the GUI.
If user is satisfied with the input values, the next step is to click on
the 'Multi Components' button.
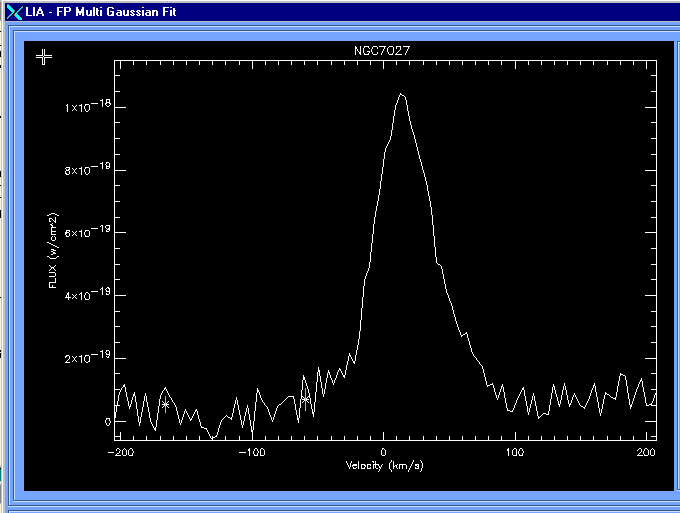
An input menu (Multi Gaussian Components) window will pop up and a figure
will be plotted in the PLOT window.

The programs can handle up to TEN gaussian components under a blended line
profile. The Quick Instruction about this window will pop-up when user clicks
on 'Multi Components' button first time. The main window will be inactive.
Multi Components ... Window
Main Buttons Descriptions
- HELP: click on this button to read the "Quick Instruction".
User may also read this "Quick Instruction" in the message window of the main window.
- CANCEL: to abort the program, click on "CANCEL" button
in the menu, and then click on "QUIT" button in the main window.
- ACCEPT: click on this button to accept the input values. The pop-up window
will be closed.
Operation on this window
- As soon as user selects the number of components, the input text menus of
that number of components become active.
- There are two ways of entering the parameters:
using the cursor, and typing the values. The values to be entered are: the center of the
line, its width, and its height (for an emission line)/optical depth (for an absorption line
under optically thin assumption). To use the cursor option, click on the "cursor" button.
Then put the cursor at the position of the center of the line on the figure and click on the
left mouse button. To define the width and the height repectively, locate the cursor
at the left edge of the line and at the peak of the line respectively on the figure,
click on the left mouse button, and repeat for the right edge of the line and at the
bottom of the line repectively.
Once user is satisfied with the input values entered, user clicks on the
"ACCEPT" button, and this window will be closed, and then the main window
now will be active.
At this point, the essential input parameters have been entered, and the program is
ready to perform the "Multi Gaussian Fitting" process: click on "Do Fit"
button in the main window.
"Do Fit" Operation
- Message Window: All the input parameters will be displayed
in the message window.
- Background Fitting: The figure will be replotted again in
the PLOT window. A small instruction window will pop up in order to tell user
how to perform this background fitting:
Click on the left mouse button to select and on the right mouse button to finish
(actions: left mouse button, left mouse button, right mouse button......)
One can see there are two marked points on the figure (see figure below).
Repeat the same action:
..... and now repeat for the other side of the spectrum
(see figure below). User may select up to the third order of
of a polynomial (see figure below) to do the fitting.
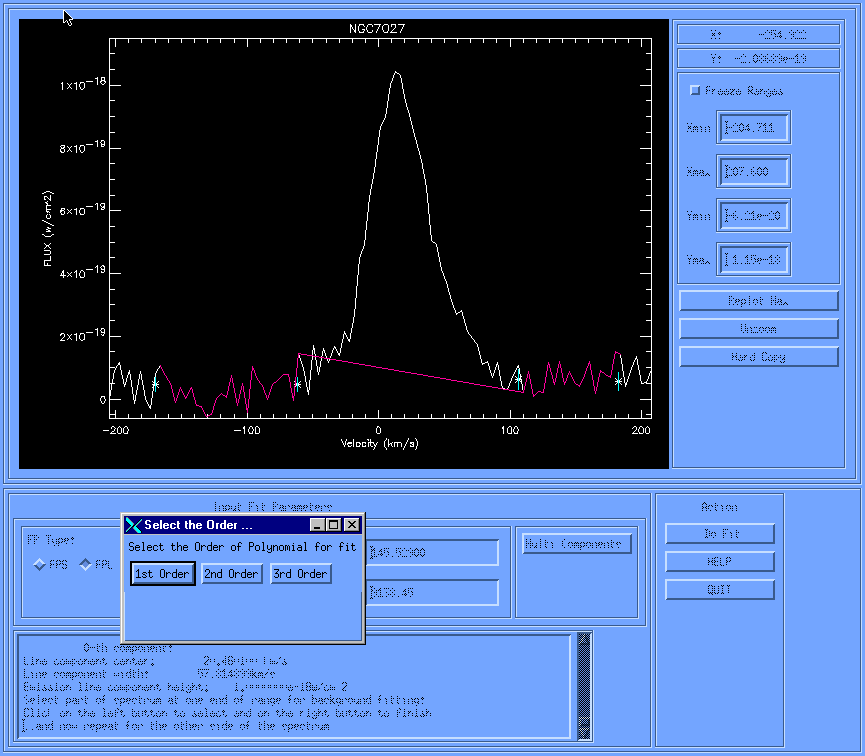
The Background Fitting will be performed. User decides whether
the background fitting is satisfactory,
If not, users may repeat the
same action again. As soon as user is satisfied with
the result of this fitting, an 'Input value for test component'
window will pop up and the main window is still inactive.
- Input values for test component:
The value of total number of components under the blended line
is displayed at the top of the window. User has to select the
component number will be used to test the performance of
the fitting. (see figure below).
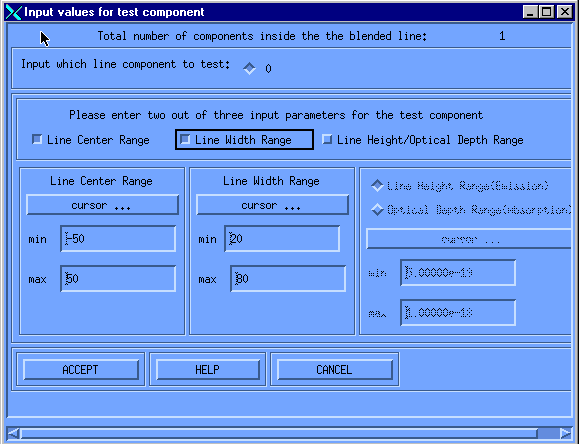
Now, user needs to select two out of three parameters (line center,
line width, and line height/optical depth). Once two out of three
parameter buttons have been selected, the text window of the third
(non-selected) one will be inactive.
-
Main Button Descriptions
- HELP: click on this button to read the "Quick Instruction"
about this window.
- CANCEL: to abort the program, click on the "CANCEL" button
in the menu, and then click on "QUIT" button in the main window.
- ACCEPT: to accept the input values. The pop-up window will be closed.
-
Once the input values are satisfactory, user clicks on the "ACCEPT" button.
The program starts to perform "the testing process". A contour plot
will be displayed in the PLOT window. Both the variance for fit and
the Xi-square for fit are displayed in a small
information (Is the range OK?) window. (see figure below)

Furthermore, user will be asked whether these values are satisfactory.
If they are, user clicks on 'Yes' button in the 'Is the range OK?' window.
If user is not satisfied and click on 'No',
the program will repeat the testing process and the 'Input values for
select component' window will pop up again. If user clicks on 'Yes', the
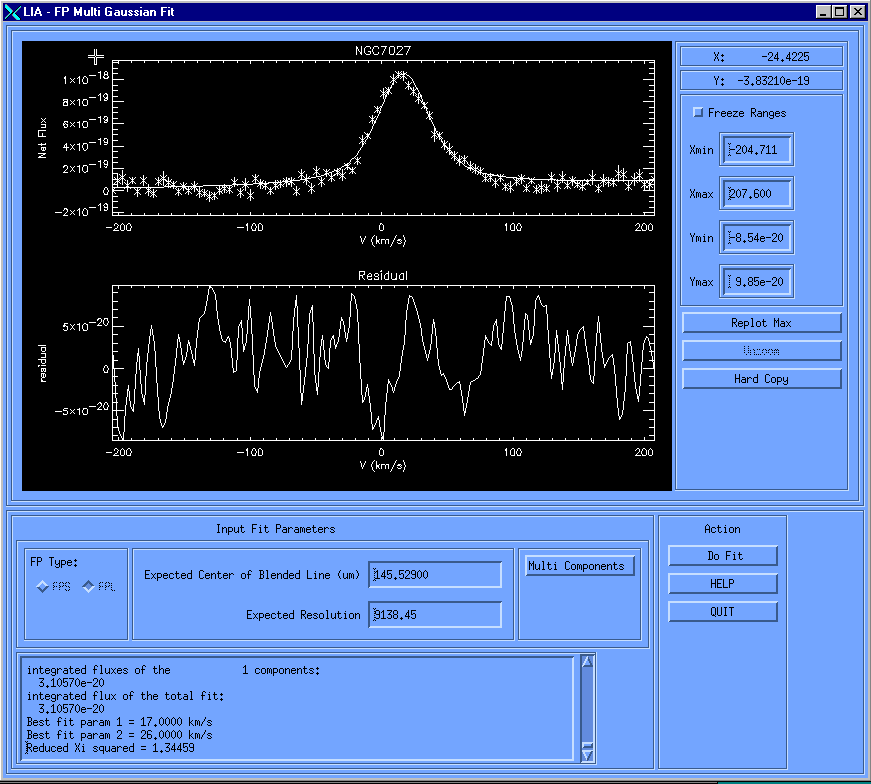
final version of the best fitted figure and the residual will be plotted
in the PLOT window (see figure below).
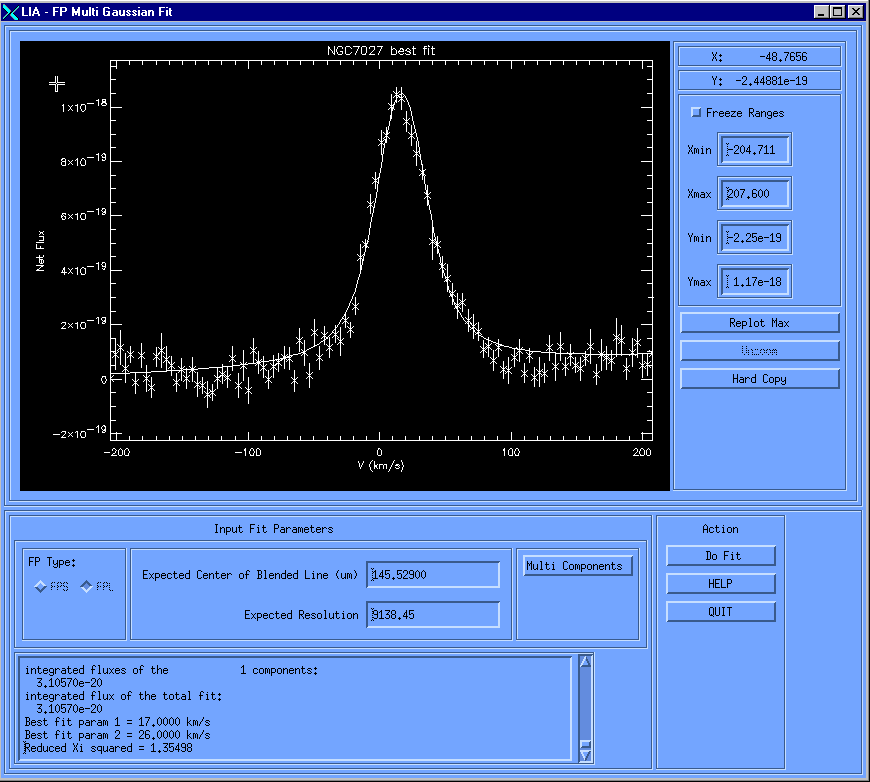
- Final action: User has the option to replot the best-fit spectrum
with data and their uncertainty. (see figure below)
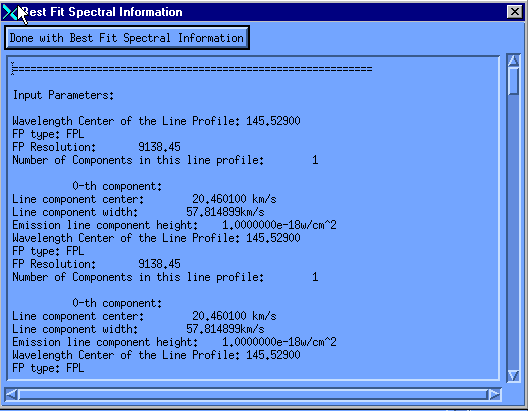
- All the input and output parameters and data will be
displayed in a pop up window (Best Fit Spectral Information), so that
user may re-examine these values again. These values are stored in a file named
'bestfit.dat'. If an old version of 'bestfit.dat' in the user's directory,
the old version
file will be renamed to 'bestfit.dat_oldN' (where N is the N-th old version). (see figure below)
- Remember to click on 'QUIT' button in order to leave the program properly.
_______________________________________________________________________________
Document by: S.J.Chan, RAL
Last Update: 21 February 2000