Using The ISAP GUI
General Layout:
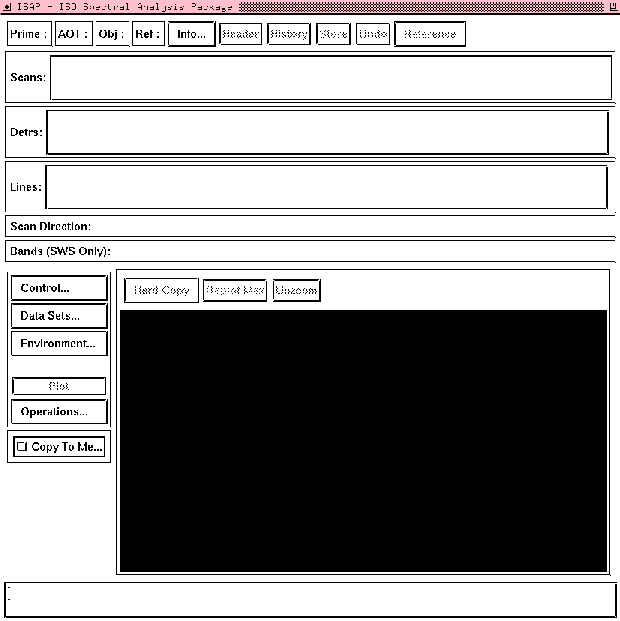
The GUI is a large interactive window consisting of a series of buttons,
placed at the top of the GUI and along the lefthand side. The main plot
window appears in the middle and there is a message window at the bottom.
To save space many of the buttons on the GUI are "pull-down" menus this
means that when you click on them using the left mouse button you will reveal
a set of additional buttons. Some of the applications e.g Average display
a secondary plot window - the use of these windows is given with the
description of the applications.
Note some of the button labels are in black and some are in grey.
A grey button means that the button cannot be used at present e.g "Replot Max"
- you have not yet plotted any data so you cannot rescale and replot it!
However as soon as you do plot some data the button changes colour and
becomes black.
The GUI is simple to use and it is driven by the use of a mouse.
- Buttons:to run an application on your data just click on the button using
the left mouse button.
- Zooming: if you hold down the left mouse
button and draw a box around some data i.e "Click and Drag" then the selected
data will be replotted.
- Selecting Data: if you hold down the right mouse button
and draw a box around some data i.e "click and Drag" then a pop-up menu will
appear that will allow you choose an application to be applied to the data you
have selected. For example
averaging the data (PUT MARKER HERe?)
Rather than describing all the buttons now it is easier to load some data
and explain each
button in a more logical fashion. If however you prefer to learn about all the buttons/routines
at once see Gui Buttons .
Working Your way through the buttons:
- The first Button you should click on is
Control .
Use the left mouse to click on the control button this will reveal a "pull down menu"
with 5 options, two of which are not yet available ().
- load
- clone
- (store current)
- (undo)
- Quit ISAP
The button you should select is "load" which will reveal a further pull-down menu
Click on the FITS button and yet another pop-up window will appear
This is an IDL widget called PICKFILE and it allows you to select your data file (finally..!).
So select a file by highlighting the file name with a click from the mouse then click on the
button marked OK.
- Your first data set should now be loaded into the GUI.
and the three labels at the top left corner should now be black and filled in,
Current Prime: L05100628.FITS - tells you the file name of your primary data set
AOT:LO2 - tells you the AOT type in this case the data file is an LWS line mode observation.
OBJ:DR21 - the name of the object
- Header - if you click on this button the FITS header will be displayed in a pop-up window.
When you havefinished reading it then click on the QUIT button at the top of the
display window.
- Info ??
- History??
- Store
- Scans
- Detrs
- Lines
- Scan Directions
- Bands
MAKE NOTE ON:
LWS RASTER OBS??
store
undo
ref
hardcopy
replot max
unzoom
datasets
environment
plot
operations
copy to me